I got the following circuit from Sam's Electronic Flash FAQ:

Lalai and I went to Megamall to do our groceries. It's out of the way but Alexan is there. I went to Alexan and bought the parts (as well as some other stuff like an extra LM1875 and a PCB so I can do some etching).
My Alexan buying experience was fraught with upsets. First, they didn't have any 4M resistors; what they had were 4.3M. Same thing for the 5V zener: they had 5.1V instead. Third, they had no 22nF, 400V capacitors. All their ceramic capacitors were 50V only, they said. So I bought eight 0.1uF capacitors, to put in series, which should give 400V. I don't even know what's the value of eight 0.1uF capacitors in series. Forgot my EE13.
When I got home I had a nasty surprise: the girl at the counter didn't give me any 4.3M resistors or 5.1V zeners. Apparently the blindingly obvious fact that a 5V zener and a 5.1V one, or a 4M resistor and a 4.3M one, are interchangeable, is beyond the ken of Alexan sales staff.
Since I didn't check the parts, I didn't discover that some critical bits were missing until I had the flash in pieces and my soldering iron hot.
Rummaging through my parts bin, I found a couple of 1M resistors and a 15V zener. Since I had no choice, I substituted the 1M for the 4M resistors; and the 15V zener for the 5V one. I knew this would result in a 15V trigger voltage instead of the desired 5V, but 15V is much better than 110V (and presumably the Cactus can survive 15V).

The circuit is very simple, so I just soldered it together point-to-point and covered the exposed wires with heat-shrink tubing and cellophane tape. I put it inside the (now vacated) battery compartment, and rewired the hot shoe to connect to my circuit instead of directly to the flash trigger.
Verifying that trigger voltage is now much, much more manageable:

While I was at it, I also did the potentiometer variable-power mod. This allows me "infinite" gradations of power, but Alexan didn't have any log-taper potentiometers, only linear-taper (another annoyance - but I don't want to go to Raon, so I grit my teeth).
After closing up the case, the ugly tape-wrapped circuit is hidden from view:
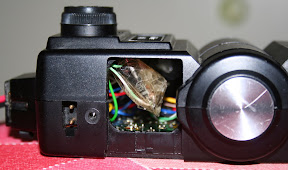
And here's another view, showing the potentiometer mod:

Great success!
2 comments:
Thanks for posting
Thanks! great totorial :)
Post a Comment